Sparkly Apple! :)

I wanted to do a green look for a change and that gave me the excuse to try out these two gorgeous Makeup Geek greens! 😀 I created glittery eyebrows, because I’m doing a review on the NYX Glitterati Glitter Cream Palette and I thought I’d show you how I do these brows. I’ll have the review and tutorial out tomorrow, but you can see how I did the eye makeup for this look below. 🙂

Products I used:

  • Lime Crime – Candy eyed eyeshadow helper
  • Makeup Geek – Appletini eyeshadow
  • Makeup Geek – Sea Mist eyeshadow
  • Sugarpill – Pressed eyeshadow in Tako
  • Sugarpill – Pressed eyeshadow in Afterparty
  • Sugarpill – Pressed eyeshadow in Midori
  • NYX – Jumbo eye pencil in Milk
  • NYX – Glitterati glitter cream palette
  • NYX – Glitter on the go in Summer Breeze
  • NYX – Glitter on the go in Cool Blue
  • La Splash – Glitter Splash in Algea Dust
  • L’Oreal Super liner
  • Viva la Diva – Glitter liner in Silver
  • Maybelline – One by One mascara
  • NYX – Box of Smokey look collection
  • False lashes from ebay

How to:

After you’ve done the brows (I’ll show                       Apply a dark green (Sea Mist) to your you how, tomorrow), apply a primer.                         crease and “outer v”. Blend this color Then place a piece of tape from the                          towards the brow. Apply a matte   outer corner of the eye to the tip of your                    white (Tako) to your brow bone, as a brow. Apply a light green (Appletini) all                      highlight. Blend it down and in to the over your lid.                                                              dark green.

Apply a tiny amount of black eyeshadow                   Apply the light green to your lower lash to your crease, to give some dimension                     line. Connect the dark green from the to the look. Blend the dark green over                       “outer v” to your lower lash line. Apply the black. Remove the piece of tape.                        white to the water line and inner corner

Apply liquid liner to your upper lash line                   Apply loose glitter on top of the eyeliner. and create a wing. On top of this, apply                  Place a light blue glitter on the inner half a silver glitter liner.                                                   and a dark blue on the outer.

Apply false lashes and mascara and you’ve finished the look! 😀

I hope you enjoyed the look!

GlitterGirlC 🙂

Rock Valentine’s Day! :)

Hi cuties! 😀 I love Valentine’s day and everything that has to do with romance! ^-^ But the makeup doesn’t always have to be pink and bubbly (even though that’s pretty too)! 🙂 I wanted to do a more dramatic and edgy look for Valentine’s and thought black and red would be a great combination! I added some glitter and hearts as well. 🙂  I hope you like it!

Products I used:

  • Lime Crime – Candy eyed eyeshadow helper
  • Sugarpill – Pressed eyeshadow in Tako
  • NYX – Jumbo eye pencil in Black Bean
  • Too Faced – Brow envy kit
  • Makeup Geek – Razzleberry eyeshadow
  • Makeup Geek – Corrupt eyeshadow
  • Makeup Geek – Shimma Shimma eyeshadow
  • Viva la Diva – Glitter liner in Silver
  • L’Oreal – Super Liner
  • Dior – DiorShow mascara
  • La Splash – Glitter Splash in Crimson Heart
  • DUO – eyelash adhesive
  • False eyelashes from ebay

How to:

  1. Apply a primer
  2. Pick up Corrupt (black) and cut your crease, using a smal angled brush
  3. Above where you cut the crease, apply more black and blend it up, towards your brow
  4. Blend this color out with a brown shadow that is close to your skintone
  5. Apply a matte, white color to your brow bone (Tako) and a shimmery highlight color over that (Shimma Shimma)
  6. Place Razzleberry, or an other red shimmery color, all over your lid
  7. Connect the black color in your “outer v” with your lower lash line and bring this color half way in
  8. Use Shimma Shimma as a highlight in the inner corner of your eye and blend this in with the black on your lower lash line
  9. Apply a silvery glitter liner to the inner corner and on your lower lash line
  10. Use a black pencil liner and apply it to your lower – and upper water line. Set it with Corrupt
  11. Line your eyes with a liquid liner and apply false lashes and mascara
  12. To apply the hearts, you can use an eyelash glue. I picked up some glue with a small  toothpick, applied it where I wanted to place the hearts and then placed them on top of it
  13. You’re done! 😀

The Makep Geek Razzleberry is a stunning color and as you can see it is much more red in real life, than how it looks in the eyeshadow picture. I love that it is red though! 😀

Have a fantastic day!

GlitterGirlC 🙂

Lady Gaga photo Shoot!

This week I did most of the makeup for Karianne’s photo shoot! It was a lot of fun and I think the pictures turned out great! 😀 This was the first time I did skeleton makeup and I don’t think I’m very good at it, lol! ^-^ It was fun making those “lightnings” though. 😀  Check out more of the pictures, here: Karianne Kaas Photography 🙂

Gorgeous models!


Look at that hair 😀

My attempt at a skeleton face X)

And me with no makeup, hehe 😛

Hope you like it and have a great weekend!

GlitterGirlC 🙂

Lovely Corals :)

Hi 😀 Today I thought I’d show you a more natural look, using coral colors. I think I’m going to wear this a lot more on an everyday basis, as a replacement for the normal browns. I just think it looks more fun and romantic, but still wearable! 🙂 And also, if you’re not that into having pink on your eyes, maybe you can use coral on Valentine’s Day instead? 😉 I hope you enjoy the look! ^^

Products I used:

  • Lime Crime – Candy eyed eyeshadow helper
  • NYX – Jumbo eye pencil in Milk
  • Sugarpill – Pressed eyeshadow in Tako
  • Makeup Geek – Mango Tango eyeshadow
  • Makeup Geek – Cinderella eyeshadow
  • Makeup Geek – Corrupt eyeshadow
  • Makeup Geek – Manderine eyeshadow
  • Makeup Gekk – Shimma Shimma eyeshadow
  • L’Oreal – Super Liner
  • Maybelline – One by One
  • mascara
  • Too Faced brow envy kit
  • False eyelashes from ebay


I have been looking for some good and beautiful coral colors for a long time now, and I must say that these are just perfect and they go very good together! 😀

Have a fantastic day!

GlitterGirlC 🙂

MUG Mermaid :)

I was playing around with my new Makeup Geek eyeshadows and thought that these two colors (Mermaid and Peacock) looked amazing together! 🙂 Of course I also wanted to add some glitter, so it ended up looking like this. 🙂

Products I used:

  • Lime Crime – Candy eyed eyeshadow helper
  • Makeuo Geek – Mermaid eyeshadow
  • Makeup Geek – Peacock eyeshadow
  • Makeup Geek – Shimma Shimma
  • Makeup Geek – Corrupt
  • NYX – Jumbo eye pencil in Milk
  • Sugarpill – Taco
  • NYX – Glitterati Glitter Cream palette
  • NYX – Glitter on the go in Summer Breeze
  • L’Oreal – Super liner
  • Maybelline – One by One mascara
  • Too Faced – Brow envy kit
  • False eyelashes and rhinestones from ebay

I’ve made a step – by – step picture tutorial this time and hope you like it! Let me know if you want me to do more of these tutorials. 😀

How to:

After applying a primer, use a small angled              Blend this color up towards the brow. brush and create this line slightly above                    Apply a highlight on your browbone  the crease, with “Peacock” or an other teal               and blend it down, into the teal.           shadow that you have.

Use the angled brush again and create a                 Use “Mermaid” or an other blue color  winged line from the outer corner of the                   and place it on the lid, in the inner     eye, like in the picture, and blend the color               corner of the eye and in between the   down.                                                                         two “wings”.

With a liguid liner, line your eyes and                         Use a glitter base and place some of    create a wing that follows the Peacock                      it on top of the teal, more towards the shadow.                                                                      outer corner. Apply blue, loose glitter.

Apply some white to your lower waterline, with a pencil liner and set it with a white eyeshadow. Apply mascara and false lashes and you’re done! 😀

I hope you liked the look!

GlitterGirlC 🙂

Blue Glitz ^^

Here’s an other glittery look! 😀 I used blue glitter this time, cus I think it’s so pretty! ❤ I have been wearing this look a few times before, but I’ve never taken a picture of it, so I thought it was about time! 🙂 I hope you like it!

Products I used:

  • Lime Crime – Candy eyed eyeshadow helper
  • NYX – Jumbo eye pencil in Milk
  • NYX – Glitterati glitter cream palette
  • NYX – Glitter on the go in Cool Blue
  • Sugarpill – Pressed eyeshadow in Dollipop
  • Sugarpill – Pressed eyeshadow in Tako
  • Sugarpill – Pressed eyeshadow in Afterparty
  • Sugarpill – Pressed eyeshadow in Poison Plum
  • L’Oreal – Super Liner
  • Mac – Semi Precious, Mineralize skin finish in Pearl
  • Maybelline – One by One mascara
  • Too Faced – Brow envy kit
  • False eyelashes from ebay

I hope you have a fantastic week!

GlitterGirlC 🙂

False eyelashes! :D

About a month ago I bought false eyelashes on ebay and today I got a whole bunch x) It was about time they arrived, because I think I had only two pairs of lashes left! ^-^ Here’s a mountain of  220 eyelashes, lol:

There are both upper – and bottom lashes and I only spent a total of 20 $ on them! 😀 I’m so excited about making some new looks with these! Any suggestions on which ones I should try first? 🙂

I hope you’re having a great day! New look coming soon! ^-^

GlitterGirlC 🙂

Beauty Portrait :)

A few days ago I did the makeup for a beauty photo shoot. 😀 Because it was going to be a beauty portrait I didn’t use lot’s of bright colors and a lot of heavy makeup. The dress that the gorgeous model (Johanne) wore, was pink, so I used a light sparkly pink color on her lid with greys in the crease. The pink eyeshadow also made her green eyes pop! 🙂

The pictures were taken by my friend and very talented photographer Karianne! You can check out more of her work, here: Karianne Kaas Photography 😀

Products I used:

Face:

  • Makeup Mekka – Retexturizing Face Primer SPF20
  • Kanebo – Sensai fluid flush in FF102 soft ivory
  • Makeup Mekka – Mineral Photo Touch™ Concealer
Eyes:
  • Lime Crime – Candy eyed eyeshadow helper
  • NYX – Box of eyeshadows, 112 colors
  • Too Faced – Brow envy kit
  • Too Faced – Naked eye kit
  • Viva la Diva – Glitter liner in Silver
  • L’Oreal – Super Liner
  • Lancome – Hypnose mascara
Cheeks:
  • Makeup Mekka – Mineral Pressed Blush in Sparkling Rose
Lips:
  • NYX – Box of Smokey Look Collection

Have a great weekend! 😀

GlitterGirlC 🙂

Bright Flower :)

Hi 😀 I just got some new Makeup Geek eyeshadows and I’m looking forward to making looks with them! 😀 The first color I fell in love with was their new shadow, called Manderine. It is such a bright, beautiful coral/orange color with some sparkles in it! ❤ It reminded me a lot of spring, so I created this colorful, flowery look.

Products I used:

  • Lime Crime – Candy eyed eyeshadow helper 
  • Makeup Geek – Manderine eyeshadow
  • Makeup Geek – Corrupt eyeshadow
  • Sugarpill – Pressed eyeshadow in Dollipop
  • Sugarpill – Pressed eyeshadow in Buttercupcake
  • Sugarpill – Pressed eyeshadow in Tako
  • Too Faced – Brow envy kit
  • L’Oreal – Super Liner
  • Maybelline – One by One mascara
  • False lashes and pearls from ebay

I hope you enjoyed the look!

GlitterGirlC 🙂

GlitterGirlC on Facebook! :)

Hi sweeties! 😀 I’ve finally made a facebook fan page for this blog! I would be SO happy if you could follow me there! ^-^ I’m going to use the page to update you on my new blogposts, gather my makeup looks and to show you makeup videoes and makeup blogs I love. I just want it to be a place of inspiration and a way of communicating with you guys! ❤

I hope to see you there! GlitterGirlC on Facebook 🙂

Have a great day!

GlitterGirlC 🙂

Sparkly Snow! :)

What inspired me to do this look, was walking around, seeing the snow sparkle beautifully on the ground! 🙂 I feel like it’s been too long since I did a glittery look hehe, so I really felt like making one now! 😀

Products used:

  • Lime Crime – Candy eyed eyeshadow helper
  • NYX – Jumbo eye pencil in Milk
  • NYX – Glitterati glittercream palette
  • NYX – Glitter on the go in Disco Ball
  • Sugarpill – Pressed eyeshadow in Tako
  • Sugarpill – Pressed eyeshadow in Afterparty
  • Sugarpill – Loose eyeshadow in Royal Sugar
  • L’Oreal – Super Liner
  • Maybelline – One by One mascara
  • Pearls and false eyelashes from ebay

I hope you enjoyed it!

GlitterGirlC 🙂


Glamorous :)

Hi 😀 I thought I’d post a more natural look this time. At least natural compared to my previous looks, lol! This look I wore a lot this Christmas and it also shows an other way to use the eyeshadows in the Makeup Geek starter kit. 🙂

Products I used:

  • Lime Crime – Candy eyed Eyeshadow helper
  • NYX – Jumbo eye pencil in French Fries
  • NYX – Jumbo eye pencil in Milk
  • Makeup Geek – Glamorous eyeshadow
  • Makeup Geek – Shimma Shimma eyeshadow
  • Makeup Geek – Cocoa Bear eyeshadow
  • Makeup Geek – Mocha eyeshadow
  • Makeup Geek – Purely Naked eyeshadow
  • Makeup Geek Corrupt eyeshadow
  • Maybelline – One by One mascara
  • L’Oreal – Super Liner
How to:
  1. Apply a primer
  2. Blend Cocoa Bear into your crease and slightly above it
  3. Create a soft transition from Cocoa Bear to you brow bone, by blending the color out with Purely Naked
  4. Highlight your brow bone with Shimma Shimma and blend it in to the browns
  5. Place Mocha directly into your crease and your “outer v” area and blend it out into Cocoa Bear
  6. Apply NYX Jumbo eye pencil in French Fries on your lid (this step is optional)
  7. Then cover your entire lid with Glamorous
  8. Apply Glamorous to your lower lash line as well
  9. Apply Cocoa Bear to the outer half of your lower lash line and then Mocha only 1/3 of the way in
  10. Use Shimma Shimma again, as a highlight to the inner corner of your eye
  11. Apply NYX Jumbo eye pencil in Milk to your water line and set this with Shimma Shimma
  12. Line your upper lash line with a liquid liner and apply mascara
  13. All done! 😀

I hope you enjoyed the look!

GlitterGirlC 🙂

Sugarpill Asylum!

I just bought a Mac 210 brush and had to try making some thin lines with it. It was really good and easy to use, and this was what I came up with. I also wanted to show you how beautiful the Sugarpill Chromalust in Asylum looks! It is the gorgeous red colour on my lid. It looks even more intense and vibrant in real life!! 😀 I hope you like it!

Products I used:

  • Lime Crime – Candy eyed eyeshadow helper
  • NYX – Jumbo eyepencil in Milk
  • Sugarpill – Loose eyeshadow in Asylum
  • Sugarpill – Pressed eyeshadow in Tako
  • Makeup Geek – Glamorous eyeshadow
  • Makeup Geek – Shimma Shimma eyeshadow
  • Makeup Geek – Corrupt eyeshadow ( the liner )
  • Too Faced – Brow envy kit
  • Maybelline – One by One mascara
  • False lashes from ebay

I hope you have a great day! ^^

GlitterGirlC 🙂

Orange and Blue :)

Hi 😀 I’m sorry it’s been a while since I posted a look! My computer got a virus on friday and I’ve only been able to use a mini pc to go on the internet a few times. My boyfriend fixed it yesterday, so now I’m finally able to post something again! 😀

Anyway, here is the look! A little crazy, but I love the colors and the color combination. 🙂

Products I used:

  • Lime Crime – Candy eyed eyeshadow helper
  • NYX – Jumbo eye pencil in Milk
  • Sugarpill – Pressed eyeshadow in Flamepoint
  • Sugarpill – Loose eyeshadow in Royal Sugar
  • Sugarpill – Pressed eyeshadow in Tako
  • L’Oreal – Super Liner
  • Maybelline – One by One mascara
  • Too Faced – Brow envy kit

I hope you liked the look!

GlitterGirlC 🙂

Sugarpill Cosmetics – Review!

Finally! Here’s my Sugarpill review! It took much longer to write than expected, so I’m sorry it’s a bit late! The Sugarpill products I’m reviewing are the two eyeshadow palettes: The Sweet Heart palette and the Burning Heart palette. Also, these five Chromalust loose eyeshadows: Tiara, Royal Sugar, Asylum, Paperdoll and Darling.

The packaging that the palettes come in is super cute and gorgeous! I love the colours and the design. The palettes themselves are really cool looking and each of them contains four eyeshadows and a large mirror. The mirror I now use every time I do my makeup. I’ve heard that some people say that the palettes are heavy and maybe they are compared to some palettes, but I’ve taken them with me a lot and never thought about the weight. 🙂

Swatches of the Sweet Heart palette:

Dollipop is a bright and beautiful matte pink colour!

Afterparty is a very vibrant, medium blue shadow, with a pearly sheen.

Midori is a very bright and pretty green eyeshadow! This colour has some shimmer to it.

Tako is a very good, matte white. You can use this for so many things: As a highlight on your brow bone, in the inner corner of your eye and on your cheekbones. You can use it on your lid and to set a white pencil liner on your lower waterline.

Swatches of the Burning Heart palette:

Flamepoint is a matte, vibrant orange eyeshadow! I think it’s a really stunning colour!

Buttercupcake is a beautiful matte yellow colour! It’s very bright and vibrant, but slightly chalky. Not a lot though!

Love + is a gorgeous, hot red! It has a matte finish with a slightly pearly sheen to it. This is a much pigmented, very true red colour! It’s the best red eyeshadow I’ve come across! Without a primer it looks very bright red and with one, it becomes more of a deep red. Also, when you fade it out, you get a very beautiful, dark pink colour!

Poison Plum: Omg! This is my favorite colour, not just of the Sugarpill colours, but my absolute favorite of all eyeshadows! It’s the most beautiful, hot purple colour ever! It’s extremely pigmented, especially with a primer underneath. It appears a little shimmery in the pan, but on the eyes it looks matte. With several layers you will definitely see the shimmer, though.

All the Sugarpill pressed eyeshadows are very bright and intense, just the way I like it! 😉 They are extremely pigmented, smooth and blend beautifully! Because Dollipop, Poison Plum, Love+ and Flamepoint contain carmine, they stain a bit. But for me, that hasn’t been a problem.

Sugarpill sells these eyeshadows in single pans as well and they are a lot bigger than many other eyeshadows! Each pan contains 4 grams/0.14 oz of product and costs 12$.  That’s three dollars less than a for a MAC eyshadow pan, which only contains 1,5 grams/0,05oz of product. So you get amazing quality eyeshadows, for a very good price! Another plus is that Sugarpill does not test on animals! 🙂

Going over to the Chromalust loose eyeshadows! They come in super cute jars, where you can see both the name of the shadow and a list of all the ingredients!

Swatches of the loose eyeshadows:    

Tiara is a metallic, silver coloured loose eyeshadow. It has a lot of glitter to it and is perfect as a highlight on your brow bone and in the inner corner of your eye. It works great as an “all over lid”- colour, especially to spice up a black smoky eye! 😉 Also, because of the tiny micro-fine particles, it will look great as a body shimmer. Weight: 4.5 grams.

Darling is a shimmery teal shadow. It contains a lot of pretty, turquoise sparkles! This was the absolute first colour I fell for out of the loose eyeshadows, and had to buy! And it has definitely lived up to my expectations! Weight: 4.5 grams.

Paperdoll is the cutest lavender eyeshadow! It has a shimmery finish and there’s nothing more to say about it, other than it’s just stunning! 🙂 Weight: 4 grams.

Asylum is a rusty red, metallic colour. This one is also beautiful and shimmery and I must say I’ve never seen a colour similar to it. I like it a lot! Weight: 5.5 grams.

Royal Sugar is the most gorgeous, bright blue colour there is! Honestly, I’m so in love with this shadow and it’s my favorite one of the loose eyeshadows! It contains a lot of beautiful, turquoise glitter which I could just stare at all day. I’ve used this colour for many things: As a lid colour, a crease colour, an eyeliner and I can’t wait to try it on my lips, my eyebrows and my nails! It would look amazing anywhere! ❤ Weight: 4 grams.

These Chromalusts are the Holy Grail for a glitter girl like me! 😀 They are super pigmented, sparkly and they look beautiful on the eyes! I think they’re easy to apply and to work with. To make them as vibrant as they can be, you can use a primer as a base and apply them wet.

When I bought my loose shadows, all of them weighed 5 grams. Now, the weight varies between 4 – 6.5 grams. This is because some colours are denser while others are fluffy, and this made the jars with the dense shadows seem half empty. Now, all the Chromalusts are filled to the top, and because the jar has no sifter, you have to be carefull not to spill any of the gorgeousness! 😉

The loose eyeshadows cost 12 $ each and that’s a very good price compared to how much product you get! I bought some of my Sugarpill products from www.sugarpillshop.com and the rest of them from http://www.makeupgeek.com/store/. The shipping to Norway took 1 – 2 weeks from the Makeupgeek store and 3 – 4 weeks from the Sugarpill shop. But I bought it during Sugarpill’s Pink Weekend sale, so that’s probably why the products took so long to arrive. I was really happy when I got them though, because I absolutely love all of the eyeshadows and I use them a lot! I also got a cute sticker of their logo with my package. You can see it in the beginning of this post. Pretty, right? 😀

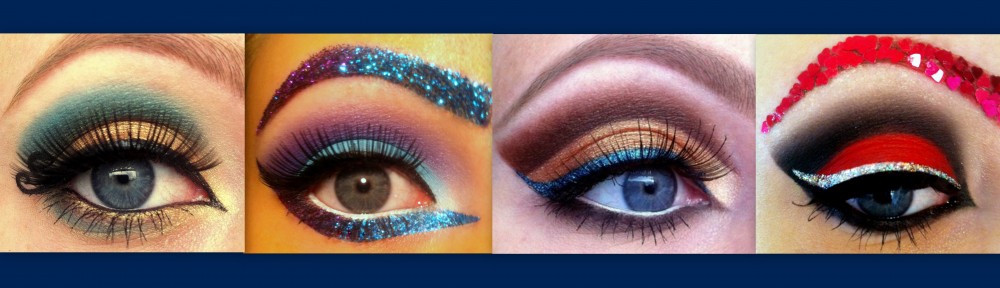
Looks where I’ve used Sugarpill eyeshadows:

I know this is a very long review, but I hope it was helpful!

GlitterGirlC 🙂

Sugar Candy! :)

Happy New Year! 😀 I hope you had an amazing celebration and spent the day with the people you love the most! I spent the day home with my family and everybody helped me pick out which pictures to post of this look 😀 I hope you like it ^^

I used 2 – 3 hours alone, to place the rhinestones exactly where I wanted them ( I know.. I’m a little crazy, but it’s always fun seeing the final result 😛 )

If you’re wondering, this is how I did the rhinestones:

  1. Apply some eyelash glue onto the back of your hand
  2. Take a small pair of scissors or a toothpick and dip the tip of it in the glue
  3. Apply the glue to where you want the rhinestone to be (for example on your brow)
  4. Because there’s some remaining glue on your tool, it’s easy to pick up a rhinestone with it and then place it on top of the glue on your brow
  5. Pick which colours you want the rhinestones to have and place them in the order you like.
  6. It’s as simple as that, but time-consuming 😛

Products I used:

  • Too Faced – Shadow Insuranse
  • NYX – Jumbo eye pencil in Milk
  • Sugarpill – Pressed eyeshadow in Tako
  • Sugarpill – Pressed eyeshadow in Dollipop
  • Sugarpill – Loose eyeshadow in Tiara
  • Sugarpill – Loose eyeshadow in  Darling
  • L’Oreal – Super Liner
  • Maybelline – One by One mascara
  • Nailart rhinestones and false eyelashes from Ebay

I used my lovely Sugarpill products for this look and hopefully I’ll finish my Sugarpill review by tomorrow! 😉

I hope you’ll have a fantastic 2012!

GlitterGirlC 🙂