Red, glittery Valentine’s Day look :)

Hi lovelies! ❤

Valentine’s Day is tomorrow, so I’ve of course made a look for that day! 😉 I’ve used eyeshadows from Sugarpill Cosmetics, and glitter and rhinestones from Glitteraction! 😀

I’ve got a picture- tutorial for this look, and then I will have a new look up tomorrow, with video tutorial! :-* I hope you like it!

Valentine's day makeup

Tutorial:

Valentine's Day makeup

  1. Apply a primer, then cover your lid with a red eyeshadow and make a cut crease shape with it, ( Sugarpill eyeshadow in Love+).
  2. Apply a matte, medium brown above the cut crease and blend it up toward the brow bone. Then place a matte highlight color onto your brow bone, (Urban Decay – Naked Basics palette).
  3. Take a matte black and place it from the cut crease, blending it up, into the brown, (Sugarpill eyeshadow in Bulletproof).
  4. Create a winged out liner with a liquid liner, (L’Oreal Super Liner in Carbon Gloss). Then, fill in your waterline with a black gel liner, (Inglot, nr.77). Apply a matte, white shadow to the inner corner of the eye, (Sugarpill eyeshadow in Tako).
  5. Place the black shadow along your lower lash line and blend it out with the brown. Cover your lid with a glitter glue, (Violet Voss) and then, carefully pack red glitter on top, (Glitteraction).
  6. Place 4 red, heart shaped rhinestones along your cut crease, (Glitteraction) and glue them on with eyelash glue and a toothpick.
  7. Apply mascara and then some upper false lashes (House of Lashes, Femme Fatale lashes). Stick 3 red individual lashes to the outer part of your lower lash line, (Sugarpill lashes in Whisper).
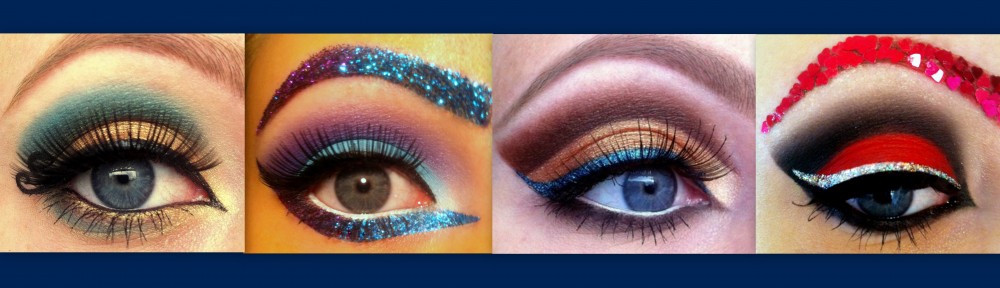
  8. Done! Closed- eye pic!
  9. Done! Open- eye pic!

Valentine's day makeup

Have a great day! ❤

GlitterGirlC 🙂

Summer Lovin :)

Hi 😀 Today I’ve got a fun, summery look for you lovelies! ❤ When I bought my Sugarpill Heart Breaker palette, I also had to get three chromalusts: Birthday Girl, Absinthe and Decora. I’m using Birthday Girl and Decora (pinks) in this look, (SO beautiful colors!) 😉 I’m also using the Sugarpill Cosmetics false lashes in Flutter, which are my favorite falsies!! 😀 Don’t they look fierce?! ❤ I hope you enjoy this look and the tutorial!

Products I’ve used:

  • Lime Crime – Candy eyed eyeshadow helper
  • NYX – Jumbo eye pencil in Milk
  • Sugarpill – Loose eyeshadow in Birthday Girl
  • Sugarpill – Loose eyeshadow in Magentric
  • Sugarpill – Loose eyeshadow in Decora
  • Sugarpill – Pressed eyeshadow in Acidberry
  • Sugarpill – Pressed eyeshadow in Midori
  • Sugarpill – Pressed eyeshadow in Tako
  • Sugarpill – False lashes in Flutter
  • Too Faced – Brow envy kit
  • L’Oreal – Super Liner in Carbon Gloss
  • Maybelline – One by one mascara
  • Rhinestones from Ebay
  • DUO – Eyelash adhesive

How to:

1. Apply primer and then NYX Jumbo pencil in Milk, all over the eye area. Place a piece of tape at the outer corner of your eye, to get a sharp line there. Apply a light/medium pink (Birthday Girl) at the inner 1/3 of the lid.

2. Continue from Birthday Girl to an other pink (Decora), and then place a darker pink (Magentric) in the outer corner. Blend these colors together. Try to get the shape that you see in the picture.

3. Remove the tape and apply a vibrant, lime green (Acidberry) at the inner part of your lower lash line. From the middle of the lower lash line, place a medium green (Midori) and kind of wing it out, higher up than the pink. Use a small, precise shadow brush for this. Apply a white highlight (Tako) to the inner corner of your eye and on your brow bone.

4. Apply NYX Milk on your lower waterline and set it with Tako. Apply liquid liner, close to your upper lash line and wing it out. Place some pink gems beside the green outwing, with eyelash glue. Apply some fabulous false lashes and mascara, and you’re done! 😀

Have a fantastic day!

GlitterGirlC 🙂

Oh sweet glitter! ^-^

Hello lovelies! ❤ I feel like it has been  a while since I used some glitter in a look! :O I’ve truly missed it! 😉 So here’s one, using TheNailDazzle glitter as usual. Purple and yellow look sooo pretty together, and makes the whole look very bright and fun! I’ve made a little tutorial as well, if you want to know how to create it!

Products used:

  • Lime Crime – Candy Eyed eyeshadow helper
  • NYX – Jumbo eye pencil in Milk
  • Sugarpill – Pressed eyeshadow in 2AM
  • Sugarpill – Pressed eyeshadow in Poison Plum
  • Sugarpill – Pressed eyeshadow in Buttercupcake
  • Sugarpill – Pressed eyeshadow in Tako
  • Sugarpill – False eyelashes in Sinnocent
  • Makeup Geek – Eyeshadow in Manderine
  • Makeup Geek – Eyeshadow in Ice Queen
  • The Nail Dazzle – Acrylic in Lemon Drop
  • NYX – Glitterati Glitter Cream palette
  • L’Oreal – Super Liner in Carbon Gloss
  • Maybelline – One by One mascara
  • Too Faced – Brow envy kit

How to:

1. I started off by applying primer and NYX Milk all over the eye area. Then, I cut my crease with a tiny eyeshadow brush, using a medium purple (2AM). I blended the color upward and into the outer v area. Underneath the brow and in the inner corner of the eye, I placed a matte, white highlight (Tako).

2. Here I used a darker purple (Poison Plum) to deepen up the crease. I blended this in with the lighter purple. These to colors look amazingly good together!! I’m definitely going to use this combination some more! 😉 I also placed some Poison Plum on the outer half of my lower lid.

3. Next, I applied a bright yellow, (Buttercupcake), on the lid. This is the base color for the glitter. Then, I applied a yellow glitter cream over the eyeshadow. I put a shimmery white in the inner corner of the eye and on the brow bone, (Ice Queen).

4. I pressed on the glitter over the glitter cream. And since there are small, orange stars in the glitter, I decided to use some orange, (Manderine), on the inner half of my lower lid. Then, I applied white to my waterline, a black liquid liner, mascara and some gorgeous false lashes. All done! 😀

I hope you liked the look!

GlitterGirlC 🙂

Ocean Breeze :)

Hello lovelies! 😀 Summer is finally approaching, so now I can wear tons of those beautiful, bright summery colors! ❤ This look I wore this weekend, for a friends birthday celebration. It kind of reminds me of sitting on the beach, looking at the clear, blue ocean, with pretty palm trees surrounding me. ^-^ The three main colors are some of my favorite Makeup Geek colors, Fuji, Poolside and Neptune! ❤ I hope you enjoy the look!

Products used:

  • Lime Crime – Candy eyed eyeshadow helper
  • NYX – Jumbo eye pencil in Milk
  • Sugarpill – Pressed eyeshadow in Tako
  • Sugarpill – False eyelashes in Saint
  • Makeup Geek – Fuji eyeshadow
  • Makeup Geek – Poolside eyeshadow
  • Makeup Geek – Neptune eyeshadow
  • Too Faced – Brow envy kit
  • L’Oreal – Super Liner in Carbon Gloss
  • Maybelline – One by One mascara
  • JulieG nail polish – Bikini
  • Isadora Jelly Kiss – 58  Orange Blossom (lips)
  • Makeup Mekka – Sparkling Rose (blush)
  • Maybelline – Fit me foundation in 220
  • Maybelline – Mineral powder foundation

 How to:

1. Apply a primer all over your lid and up to your brow. Then cover the same place witn NYX Jumbo eye pencil in Milk to make your eyeshadows look more vibrant. Take a lime green (Fuji) and apply it to the inner half of your eye lid.

2. Apply a medium colored blue (Poolside) to the other half of your lid and make sure to blend the two colors together.

3. Take a darker blue than Poolside (Neptune) and blend it in to your crease and outer v area. Also, blend it up toward your brow. Use a matte, white highlight color (Tako) on your brow bone and blend it down, slightly in with the blue. Apply the same white to the inner corner of your eye.

4. Place your crease color in the outer corner of your lower lid, Poolside in the middle and Fuji closest to the inner corner. Blend these colors together.

5. All that is left to do, is to line your eyes, apply mascara and some fabulous false lashes! These are called Saint and they’re from Sugarpill Cosmetics! ❤

Thank you guys so much for voting for my “Plum meets Pear” look on Makeupbee! I truly appriciate all your support! ❤ If you’d like to, you can like this look in there as well: here 🙂

Have a fantastic day!

GlitterGirlC 🙂

Prom in Glitter!

Prom is that special day when you can dress up like a princess and of course, wear fabulous makeup! 😉 It’s a day where you deserve to sparkle a little extra, so glitter is definitely a must! 😀 This is a look I would wear for prom and I actually did a similar look on my sister, for her prom, last year. I hope this look will give you some inspiration on how you want your prom look to be! ^-^

I entered this look in Makeupbee’s “Sparkle for prom” competition, and if you like it, I would be super happy if you could vote for it, here! ❤ Thank you SO much! Let me know if you’ve entered a look to the competition too! 😀

Products used:

  • Lime Crime – Candy eyed eyeshadow helper
  • NYX – Jumbo eye pencil in Milk
  • Sugarpill – Pressed eyeshadow in Tako
  • Sugarpill – Pressed eyeshadow in Dollipop
  • Sugarpill – Pressed eyeshadow in Poison Plum
  • Sugarpill – False eyelashes in Spark
  • Makeup Geek – Corrupt eyeshadow
  • Barry M – Eyeshadow trio (light silver)
  • NYX – Glitterati Glitter Cream Palette
  • NYX – Glitter on the go in Disco Ball
  • L’Oreal – Super Liner in Carbon Gloss
  • Maybelline – One by One mascara
  • Too Faced – Brow envy kit

How to:

Step 1: Apply a primer to your entire eye area. Place NYX Milk to your brow bone and the inner corner of your eye. Cut your crease with a small angled brush, slightly above your natural crease. Use a bright pink color, (Dollipop).

Step 2: Use the same color and blend it up towards your brow bone and underneath your eye.

Step 3: Take a dark purple (Poison Plum) and place it along your cut crease and lower lash line. Blend it in with the pink.

Step 4: Apply a tiny bit of a matte black eyeshadow (Corrupt) to your fake crease. Blend it upwards and connect it with your lower lash line as well.

Step 5: Then apply some more black to the same area and focus on the blending. I applied a little black at a time, to make sure that I didn’t use too much black, because that might have ruined the whole blending process!

Step 6: Apply a shimmery silver shadow to your lid, as a base color for the glitter. Then cover that with a silver NYX glitter cream or an other glitter base. Apply a silver glitter on top, by packing it on, to get the least amount of fallout! Line your upper lash line with a liquid liner and apply mascara.

All that’s left to do, is to apply white to your lower water line, with an eye pencil and apply some gorgeous false eyelashes! 😉

I hope this tutorial was helpful and that you liked the look!

GlitterGirlC 🙂

Easter Chicken! :P

Easter is not quite over yet, right?! I’m taking advantage of that and posting an other yellow, colorful look! 😀 I made this over a week ago, but I was a little bit uncertain about the eyemakeup! But since I worked so hard, making these feathers, I thought I’d post it anyway! 😉 I’m actually happier with the end result than I thought I would be! 😀 I hope you like it! ❤

Products I used:

  • Lime Crime – Candy eyed eyeshadow helper
  • NYX – Jumbo eye pencil in Yellow
  • NYX – Jumbo eye pencil in Milk
  • Sugarpill – Pressed eyeshadow in Tako
  • Sugarpill – Pressed eyeshadow in Dollipop
  • Sugarpill – Pressed eyeshadow in Buttercupcake
  • Sugarpill – Pressed eyeshadow in Flamepoint
  • TheNailDazzle – Glitter eyes in Lemone’
  • L’Oreal – Super Liner in Carbon Gloss
  • Maybelline – One by One mascara
  • False lashes and rhinestones from ebay
  • Feathers from a local store

How to:

Step 1: Cover your brows with NYX Jumbo eye pencil in Yellow. Set it with a yellow shadow (Buttercupcake).

Step 2: Make small feathers by cutting some large ones with scissors. Glue them to your eyebrows with eyelash glue. Then, cover the ends of the feathers with some yellow rhinestones.

Step 3: Cut your crease with a bright pink (Dollipop), and blend the color upwards. Blend in a bright orange (Flamepoint), in between the pink and the feathers. Apply a white highlight (Tako) to the inner corner of your eye.

Step 4: Apply the yellow eyeshadow to your lid as well, as a base color for the glitter. Then, cover this with a glitter base.

Step 5: Gently press a beautiful, light yellow glitter onto your lid. Connect the crease color with the lower lash line. Apply the pink first and then blend it out with the orange.

Step 6: Create a winged out liner, with a liquid eyeliner. That’s the easiest type of liner to use over glitter.

The final step is to apply white to your waterline, mascara to your lower lashes and some gorgeous falsies! 😉

I hope you had an amazing Easter! ❤

GlitterGirlC 🙂

Chickadee :)

Today, I’ve got a more natural look for you guys! 🙂 I’m using mostly Makeup Geek eyeshadows, in brown and yellow tones! ^-^ I think it’s the MUG shadows I use the most in my everyday makeup. They just come in many unique colors, and I love them! I hope you like the look! 😀

Products used:

Eyes:

  • Lime Crime – Candy eyed eyeshadowhelper
  • NYX – Jumbo eye pencil in Milk
  • Makeup Geek – Eyeshadow in Chickadee
  • Makeup Geek – Eyeshadow in Yellow Brick Road
  • Makeup Geek – Eyeshadow in Mocha
  • Makeup Geek – Eyeshadow in Cocoa Bear
  • Makeup Geek – Eyeshadow in Shimma Shimma
  • Makeup Geek – Eyeshadow in Corrupt
  • Sugarpill – Pressed eyeshadow in Tako
  • Sugarpill – False eyelashes in Saint
  • MAC – Blacktrack fluidline
  • L’Oreal – Super Liner in Carbon Gloss
  • Maybelline – One by one mascara
Face:
  • Makeup Mekka – Retexturizing Face Primer SPF 20
  • Maybelline – Fit Me foundation in nr. 220
  • Makeup Mekka – Blush in Rose Bud
  • Too Faced – Chocolate Soleil Bronzing Powder
  • MAC – Mineralized Skinfinish, Semi Precious in Pearl

How to:

Step 1: Apply a primer and NYX JEP in Milk to your lid and brow bone. Cover your lid with Yellow Brick Road (light yellow) and blend Chickadee (dark yellow) into your crease and outer v area. Apply a matte, white eyeshadow as a highlight, to your brow bone and inner corner of your eye.

Step 2: Place the light yellow on your lower lid and apply Chickadee to the outer part of your lower lid. Blend these two colors together.

Step 3: Place Cocoa Bear (redish brown) directly into your crease and blend it slightly out. Apply Shimma Shimma (shimmery highlight) in the inner corner of the eye and right underneath the brows.

Step 4: To get even more dimension, apply Mocha (dark brown) to your crease and outer v. Blend this a bit up as well, so that everything looks smooth.

Step 5: Fill in your waterline with a black gel liner or pencil liner. Set this with Corrupt (black). Line your eyes and create a wing in the outer corner. Apply mascara and some false lashes and you’re done. 😀

I used the Saint false eyelashes by Sugarpill, which I think are perfect to glam up a more natural look! 😉

Have a wonderful day!

GlitterGirlC 🙂

Flower Dreams :)

Hi lovelies! 😀 As you might already know, I love the combination of blue and purple! ^-^ And when most of my new Makeup Geek eyeshadows were purple and blue, I had to make a look using these colors! 😉 I love these MUG eyeshadows so much! They’re the most silky ones I’ve ever tried and they have such good pigmentation!

For the blue liner I used Sugarpill‘s loose eyeshadow in Royal Sugar. And I applied it with Too Faced Liquif eyeshadow transformer, which transforms your shadow into a liner. I didn’t like this product at first, because I tried it with pressed eyeshadows. That did not look good! But with loose eyeshadows it works great! 🙂 The blue liner over the purple shadow, was inspired by the wonderful Nikkie from Nikkie Tutorials on Youtube! 🙂 Check out her gorgeous makeup tutorials if you haven’t already! 😉 I’ve linked to her on my Facebook page.

Products I used:

  • Lime Crime – Candy eyed eyeshadow helper
  • NYX – Jumbo eye pencil in Milk
  • Sugarpill – Pressed eyeshadow in Tako
  • Sugarpill – Loose eyeshadow in Royal Sugar
  • Sugarpill – False Eyelashes in Stormy
  • Makeup Geek – Poolside eyeshadow
  • Makeup Geek – Unicorn eyeshadow
  • Makeup Geek – Neptune eyeshadow
  • Makeup Geek – Wisteria eyeshadow
  • Makeup Geek – Corrupt eyeshadow
  • Makeup Geek – Shimma Shimma eyeshadow
  • Too Faced – Liquif eyeshadow transformer
  • Too Faced – Brow envy kit
  • Maybelline – One by One mascara
  • Rhinestones from ebay

How to:

After applying a primer and NYX JEP in                    Place a piece of tape on the outer   Milk, take “Wisteria” (lilac) and pack it on                  corner of your eye. Apply “Poolside”   all over the lid.                                                           (blue) to the crease and blend upward.

Apply Tako (white) to your brow bone,                      Apply a white to the inner corner of    as a highlight. Place “Neptune” (dark blue)               your eye and on your lower lash line. right into your crease, blend it up into the                 Apply the lilac color to the middle of the other blue. Apply “Unicorn” (purple) to the                lower lid and Neptune to the outer 1/3. crease, where the lilac and the blue meets,             To give more depth to the look, apply a to get a more blended transition.                              a tiny bit of black to the crease.

Mix Royal Sugar with any mixing medium                To apply the flowers, use a toothpick to you like, and apply it with a small liner                      place eyelash glue, where you want brush, as a liner. Apply mascara to the                    the flowers. Then apply them. Put on upper – and lower lash line.                                       gorgeous lashes and you’re done! 😀

I took these “how to” pictures when it was still bright outside. That’s why they look more blue than the others. 😛

I hope you enjoyed the look!

GlitterGirlC 🙂

The smell of summer :)

I can’t wait for summer, sunshine and hot weather! 😀 So this look is inspired by one of my favorite perfumes, “Rockin Rio” by Escada. Both the smell and the colors remind me of summer! ^-^

Products I used:

  • Lime Crime – Candy eyed eyeshadow helper
  • NYX – Jumbo eye pencil in Milk
  • NYX – Glitterati Glitter Cream palette
  • Makeup Geek – Cinderella eyeshadow
  • Makeup Geek – Mango Tango eyeshadow
  • Makeup Geek – Shimma Shimma eyeshadow
  • Sugarpill – Pressed eyeshadow in Dollipop
  • Sugarpill – Pressed eyeshadow in Flamepoint
  • Sugarpill – Pressed eyeshadow in Buttercupcake
  • Sugarpill – Pressed eyeshadow in Tako
  • The Nail Dazzle – Glitter Eyes in nr. 1
  • The Nail Dazzle – Glitter Eyes in nr. 4
  • The Nail Dazzle – Glitter Eyes in nr. 6
  • Too Faced – Brow envy kit
  • L’Oreal – Super Liner in Carbon Gloss
  • Maybelline One by One mascara
  • Pearls and false lashes from ebay
How to:

After applying a primer, apply NYX JEP                    Apply Mango Tango (a darker coral) to in Milk on your lid and brow bone. Cover                   your crease and blend it up toward the your lid with Cinderella (a coral) and blend               brow. Apply Tako as a highlight on your it a bit up.                                                                   brow bone.

Create a thick, white line on your upper                    Apply Buttercupcake (yellow) to the lash line, where you want the glitter. I                        upper part of this line, where you’re used NYX JEP in Milk to do this. Apply                      yellow glitter is going to be. Apply  white to your water line as well and set                     Shimma Shimma on your brow bone, it with a white shadow. Apply coral to the                  to add some shimmer to the highlight. lower lash line as well.

Fill in the rest of the white, with Flame-                    I used NYX glitter cream as a base for  point (orange) and Dollipop (pink).                           the glitter. Use a liner brush to apply it.

After you’ve carefully applied the glitter, you can line your eyes with a black liquid liner. Apply mascara and false lashes. To make the look even more fun, add pearls in orange, yellow and pink, under your eye. I applied them with a toothpick, with DUO lash glue on. 🙂

I hope you liked the look!

GlitterGirlC 🙂


Let’s Rock! :D

Here’s an other very glittery look for you lovelies! 😀 I was listening to Status Quo’s song “Let’s Rock” the other day, and was inspired to do this look! I love this band, but I don’t think anyone loves it more than my mom, hehe! 😛 I feel like red, purple and black are very Rock’n Roll colors, when you put them together. To make the look a little bit more special, I added three different glitters from TheNailDazzle. All the shadows and the upper eyelashes are from Sugarpill! ❤ I hope you enjoy the look. 🙂

Products used:

  • Lime Crime – Candy eyed eyeshadow helper
  • Sugarpill – Pressed eyeshadow in Tako
  • Sugarpill – Pressed eyeshadow in Poison
  • Plum
  • Sugarpill – Loose eyeshadow in Hysteric
  • Sugarpill – Loose eyeshadow in Paperdoll
  • Sugarpill – Loose eyeshadow in Stella
  • Sugarpill – Loose eyeshadow in Asylum
  • Sugarpill – False eyelashes in Precious
  • NYX – Box of Smokey look Collection (black)
  • NYX – Glitterati Glitter Cream Palette
  • L’Oreal – Super Liner in Carbon Gloss
  • MAC – Blacktrack fluidline
  • The Nail Dazzle – Acrylic in Star Fish
  • The Nail Dazzle – Acrylic in Chunky Black
  • The Nail Dazzle – Acrylic in Red
  • Too Faced – Brow envy kit
  • Lower lashes from ebay

How to:

After applying a primer, Place a piece of                  Blend the black up toward your        tape at the outer corner of your eye. Cut                  eyebrow. This is going to give some your crease, slightly above your normal                   dimension to the look.                 crease. Follow this shape.

Place Hysteric (dark, shimmery purple)                   Apply Asylum (red) to the inner part of over the black and blend it upward.                          the eye, Poison Plum (purple) in the Blend this eyeshadow out with Paper Doll               middle and then black at the end. Apply (lilac).                                                                        Tako as a highlight, on your brow bone.

Apply Stella (black) in the crease, to                          Apply purple glitter over the purple create even more depth. Place a glitter-                    shadow and black glitter over the  base over the red and apply red glitter.                      black shadow. Blend them slightly.

Use a liquid liner on your upper lash line. (It’s easier to use a liquid liner than a gel liner, if you’ve got glitter on your lid.) Apply black to the upper – and lower waterline, with a gel liner or a pencil liner. Set it with a matte, black eyeshadow. Place Hysteric on your lower lash line. To finish off the look, apply some gorgeous false lashes to your upper – and lower lash line! 😀

I hope you liked the tutorial and that you’re having a great day! ^-^

Rock on! xD

GlitterGirlC 🙂

NYX Glitterati Glitter Cream Palette – Review! :)

The NYX Glitterati Glitter Cream Palette consists of 21 glittery, cream colors. I got this palette from my fiance, last Christmas, and I’ve used a lot of it this past year! ❤ I was a little dissapointed at first, because I thought the glitter would appear more vibrant on my lid. But I don’t think these creams are suppose to be used alone! They only appear chunky and crease that way. What I use the creams for, is as a base for loose glitter! I use them as a base on my lid, brow, lips and if I want to use glitter as my liner. But you can use these colors anywhere you want to place loose glitter! 😀

I often get questions about this palette and how I use it, so I thought I’d show you in pictures how I create glitter eyebrows. An important thing to remember when applying this as a glitter base, is to only apply a thin layer of it! This will prevent the glitter on top of it from creasing. 🙂 I also use the creams in the same color as the loose glitter I’m using.

Here’s the tutorial on how I do the brows:

Apply eyeshadows to the brows, in the same colors as the glitters you’re going to place on top. This will make everything look more compound, even if there’s a few places the glitter doesn’t cover. I thought blue and green would be a cool combination! ^-^

With a small, angled brush start applying the darkest green glitter cream on the inner part of the brow. Then use the lightest blue color in the middle and the darkest on the outer corner. Blend these colors slightly together.

Use the same angled brush to apply the loose glitter over the glitter creams. Apply it carefully to prevent a lot of fallouts and take your time! If there is any fallout and you want to sharpen the edges, use a piece of tape to pick up the glitter and to fix the brow shape. In the end, go over with a q-tip with makeup remover. Now you’re all done and can start applying your eye makeup! 😀

I absolutely love this palette and I’m glad I got it, because now I can’t live without it! I’m too in love with glitter, lol! 😉

You can find the palette here 🙂

I hope this review and tutorial was helpful!

GlitterGirlC 🙂

Sparkly Apple! :)

I wanted to do a green look for a change and that gave me the excuse to try out these two gorgeous Makeup Geek greens! 😀 I created glittery eyebrows, because I’m doing a review on the NYX Glitterati Glitter Cream Palette and I thought I’d show you how I do these brows. I’ll have the review and tutorial out tomorrow, but you can see how I did the eye makeup for this look below. 🙂

Products I used:

  • Lime Crime – Candy eyed eyeshadow helper
  • Makeup Geek – Appletini eyeshadow
  • Makeup Geek – Sea Mist eyeshadow
  • Sugarpill – Pressed eyeshadow in Tako
  • Sugarpill – Pressed eyeshadow in Afterparty
  • Sugarpill – Pressed eyeshadow in Midori
  • NYX – Jumbo eye pencil in Milk
  • NYX – Glitterati glitter cream palette
  • NYX – Glitter on the go in Summer Breeze
  • NYX – Glitter on the go in Cool Blue
  • La Splash – Glitter Splash in Algea Dust
  • L’Oreal Super liner
  • Viva la Diva – Glitter liner in Silver
  • Maybelline – One by One mascara
  • NYX – Box of Smokey look collection
  • False lashes from ebay

How to:

After you’ve done the brows (I’ll show                       Apply a dark green (Sea Mist) to your you how, tomorrow), apply a primer.                         crease and “outer v”. Blend this color Then place a piece of tape from the                          towards the brow. Apply a matte   outer corner of the eye to the tip of your                    white (Tako) to your brow bone, as a brow. Apply a light green (Appletini) all                      highlight. Blend it down and in to the over your lid.                                                              dark green.

Apply a tiny amount of black eyeshadow                   Apply the light green to your lower lash to your crease, to give some dimension                     line. Connect the dark green from the to the look. Blend the dark green over                       “outer v” to your lower lash line. Apply the black. Remove the piece of tape.                        white to the water line and inner corner

Apply liquid liner to your upper lash line                   Apply loose glitter on top of the eyeliner. and create a wing. On top of this, apply                  Place a light blue glitter on the inner half a silver glitter liner.                                                   and a dark blue on the outer.

Apply false lashes and mascara and you’ve finished the look! 😀

I hope you enjoyed the look!

GlitterGirlC 🙂

MUG Mermaid :)

I was playing around with my new Makeup Geek eyeshadows and thought that these two colors (Mermaid and Peacock) looked amazing together! 🙂 Of course I also wanted to add some glitter, so it ended up looking like this. 🙂

Products I used:

  • Lime Crime – Candy eyed eyeshadow helper
  • Makeuo Geek – Mermaid eyeshadow
  • Makeup Geek – Peacock eyeshadow
  • Makeup Geek – Shimma Shimma
  • Makeup Geek – Corrupt
  • NYX – Jumbo eye pencil in Milk
  • Sugarpill – Taco
  • NYX – Glitterati Glitter Cream palette
  • NYX – Glitter on the go in Summer Breeze
  • L’Oreal – Super liner
  • Maybelline – One by One mascara
  • Too Faced – Brow envy kit
  • False eyelashes and rhinestones from ebay

I’ve made a step – by – step picture tutorial this time and hope you like it! Let me know if you want me to do more of these tutorials. 😀

How to:

After applying a primer, use a small angled              Blend this color up towards the brow. brush and create this line slightly above                    Apply a highlight on your browbone  the crease, with “Peacock” or an other teal               and blend it down, into the teal.           shadow that you have.

Use the angled brush again and create a                 Use “Mermaid” or an other blue color  winged line from the outer corner of the                   and place it on the lid, in the inner     eye, like in the picture, and blend the color               corner of the eye and in between the   down.                                                                         two “wings”.

With a liguid liner, line your eyes and                         Use a glitter base and place some of    create a wing that follows the Peacock                      it on top of the teal, more towards the shadow.                                                                      outer corner. Apply blue, loose glitter.

Apply some white to your lower waterline, with a pencil liner and set it with a white eyeshadow. Apply mascara and false lashes and you’re done! 😀

I hope you liked the look!

GlitterGirlC 🙂